在上一篇文章全景预览中,我们通过Threejs使用多种方式实现了全景预览的效果,以及俯瞰效果的场景动画,但是这都是在单个场景中实现的;也有读者评论说讲一下多场景下的场景过渡效果是如何实现的,那么本文我们就来学习一下多场景的过渡效果。
在实现多场景前,我们先来了解three.js中一个重要的概念:离屏渲染;只有理解了这个概念,我们才能够在后续实现多场景的过渡效果。
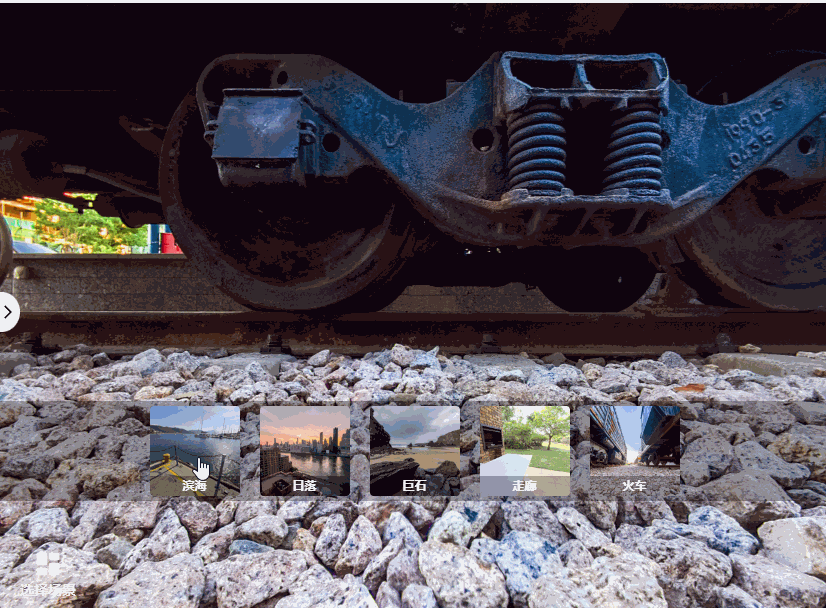
本文的全景过渡效果可以点击链接查看
离屏渲染
离屏渲染指的是将渲染结果暂时存在GPU内部的帧缓存中,而不是直接显示在画布上,这样做的好处是可以对渲染结果进行后期处理,如添加滤镜、反射折射、当成纹理应用在几何体等等。
在three.js中,一共有3种离屏渲染的类:
在普通的渲染中,我们把scene场景保存到canvas画布的默认帧缓冲区,也就是直接渲染到Canvas画布上,它是没有具体的渲染目标的:
| renderer.render(scene, camera);
|
而离屏渲染则不会直接渲染到画布上去,它设置了具体的渲染目标(也就是Target单词的含义);将渲染结果存储到目标对象(比如WebGLRenderTarget),通过目标对象的纹理属性.texture,可以拿到渲染结果的像素。
| const target = new WebGLRenderTarget(512, 512);
renderer.setRenderTarget(target);
renderer.render(scene, camera);
|
WebGLCubeRenderTarget的用法也差不多,不过它主要用于创建立方体贴图渲染目标;两者的区别主要在于创建的渲染目标的类型和用途,WebGLCubeRenderTarget专门用于创建立方体贴图渲染目标,也就是三维的目标;而WebGLRenderTarget则用于创建普通的二维渲染目标,适用于各种需要渲染到纹理的场景;下面我们看下两者的具体用法。
谢小飞博客专用防爬虫链接,想要看最新的前端博客请点这里
WebGLCubeRenderTarget
我们先来看下WebGLCubeRenderTarget的用法,它一般结合CubeCamera使用;我们知道在three.js中透视相机PerspectiveCamera是模拟了现实中人眼的视角,其可视体是一个锥体。
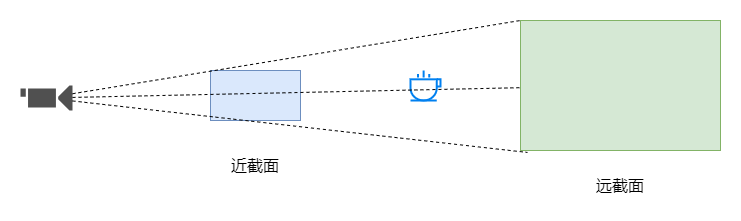
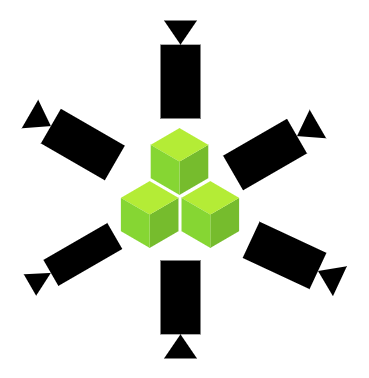
而CubeCamera立方体相机主要用于渲染物体周围的环境贴图;它以相机的位置为中心,从六个方向(前、后、左、右、上、下)拍摄场景,实现反射和折射效果;相当于在6个方向上创建了透视相机,然后并将拍摄的场景渲染到一个WebGLCubeRenderTarget上。
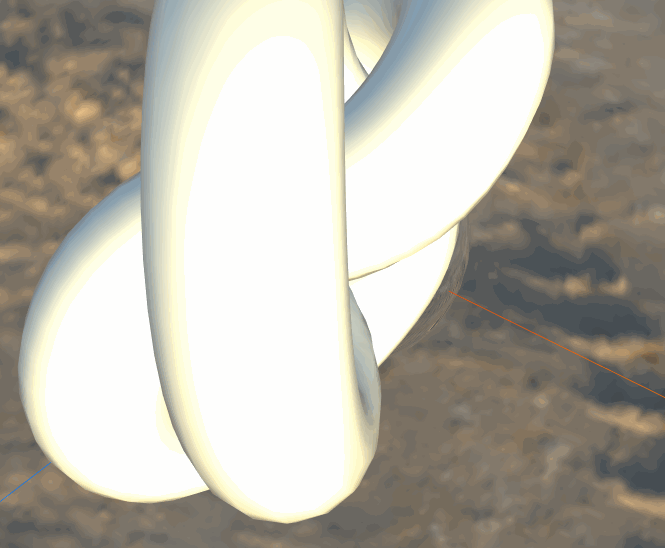
CubeCamera立方体相机的这种特性使得在实现负责的光照和反射效果时非常有用;它的用法也很简单,为了反射效果,我们给场景一个hdr贴图。
| new RGBELoader().load(
"/textures/equirectangular/quarry_01_1k.hdr",
(texture) => {
texture.mapping = EquirectangularReflectionMapping;
this.scene.background = texture;
this.scene.environment = texture;
}
);
|
然后我们构建WebGLCubeRenderTarget实例,它接收一个size和纹理参数的对象;size越大,纹理也就越清晰,不过也更加耗费性能;一般我们选择一个适中的数值,256或者512即可:
| const cubeRenderTarget = new WebGLCubeRenderTarget(256, {
format: RGBAFormat,
generateMipmaps: true,
minFilter: LinearMipmapLinearFilter,
});
|
接着就是创建我们的立方体相机了,将上面创建好的cubeRenderTarget传入,
谢小飞博客专用防爬虫链接,想要看最新的前端博客请点这里
| const cubeCamera = new CubeCamera(1, 1000, cubeRenderTarget);
|
最后添加需要反射的球体,将cubeRenderTarget的纹理贴到球体上:
| const material = new MeshStandardMaterial({
envMap: cubeRenderTarget.texture,
roughness: 0.05,
metalness: 1,
});
const sphere = new Mesh(new SphereGeometry(10), material);
sphere.position.set(0, 0, 0);
this.scene.add(sphere);
|
在渲染时,我们不仅需要渲染透视相机,还要不断的更新立方体相机:
谢小飞博客专用防爬虫链接,想要看最新的前端博客请点这里
| const render = ()=>{
this.cubeCamera.update(this.renderer, this.scene);
this.renderer.render(this.scene, this.camera);
}
|
我们在反射球周围添加一个旋转的球体,就能看到镜面反射的效果了:
WebGLRenderTarget
理解了立方体相机的原理和用法,立方体相机的案例是离屏渲染的一个简单应用;然后就是我们离屏渲染的重要类:WebGLRenderTarget,我们来看下它的用法。
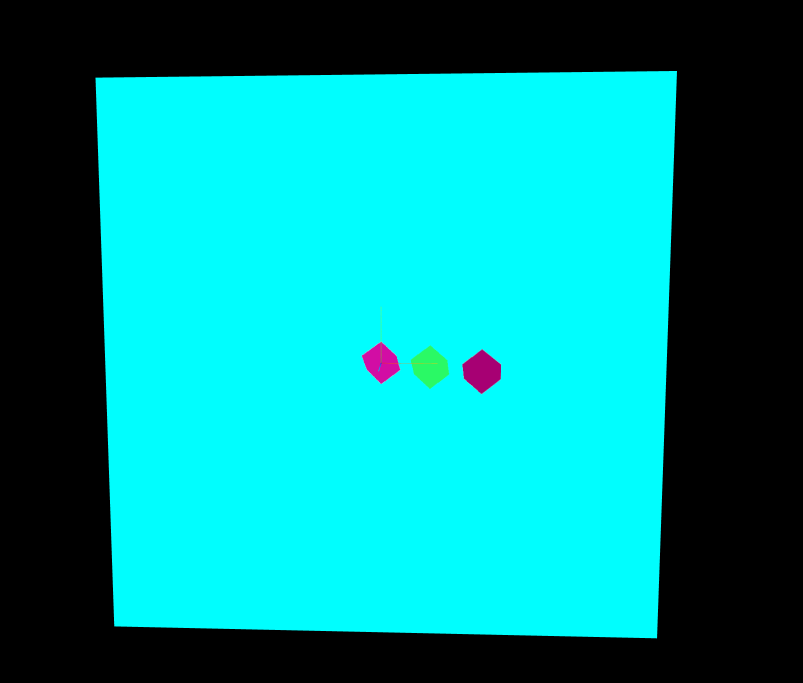
假设我们现在有这样一个场景,一个子场景中有3个立方体,不停的旋转;另外有一个父场景,有一个平面,呈现了子场景中的场景,有种嵌套画中画的感觉。
首先我们构建一个子场景类,同时将三个立方体放到boxs数组中去:
1
2
3
4
5
6
7
8
9
10
11
12
13
14
15
16
17
18
19
20
21
22
23
24
|
class SubScene {
constructor() {
this.scene = new Scene();
this.scene.background = new Color(0x00ffff);
this.camera = new PerspectiveCamera(55, 1, 1, 20000)
this.boxs = [];
for (let i = 0; i < 3; i++) {
const col = new Color().setHex(0xffffff * Math.random());
const box = new Mesh(
new BoxGeometry(5, 5, 5),
new MeshBasicMaterial({
color: col,
})
);
box.position.set(10 * i, 0, 0);
this.boxs.push(box);
this.scene.add(box);
}
}
}
|
需要注意的是,这里子场景中相机的aspect设置为1,因此我们在父场景中渲染物体的宽高比例也为1,否则会出现锯齿。
然后就是最重要的主场景逻辑,我们先把子场景和父场景的scene进行初始化,
| class Index {
constructor() {
this.subScene = new SubScene();
this.scene = new Scene();
this.camera = new PerspectiveCamera(55, window.innerWidth / window.innerHeight, 1, 20000);
}
}
|
父场景的相机比例还是为页面的宽高比例:window.innerWidth / window.innerHeight
谢小飞博客专用防爬虫链接,想要看最新的前端博客请点这里
然后我们构建一个WebGLRenderTarget实例,用来存储子场景的渲染结果:
| class Index {
constructor() {
this.rendererTarget = new WebGLRenderTarget(
window.innerWidth,
window.innerHeight
);
}
}
|
再是用于渲染子场景的平面物体,将其map设置为rendererTarget对象,它的大小比例和子场景的相机比例保持一致:
| const material = new MeshPhongMaterial({
map: this.rendererTarget.texture,
side: DoubleSide,
});
const mesh = new Mesh(new PlaneGeometry(100, 100), material);
this.scene.add(mesh);
|
谢小飞博客专用防爬虫链接,想要看最新的前端博客请点这里
最后我们在渲染函数中,让子场景的中的立方体旋转起来:
| const render = () => {
this.subScene.boxs.map((item) => {
item.rotation.x += 0.01;
item.rotation.y += 0.01;
});
this.renderer.setRenderTarget(this.rendererTarget);
this.renderer.render(this.subScene.scene, this.subScene.camera);
this.renderer.setRenderTarget(null);
this.renderer.render(this.scene, this.camera);
}
|
渲染时,先将渲染对象setRenderTarget设置成子场景,渲染结果保存到目标对象this.rendererTarget中;最后将渲染目标切回到主场景来进行渲染;最后我们看到的效果就是一个平面物体中渲染另一个场景:
多场景切换
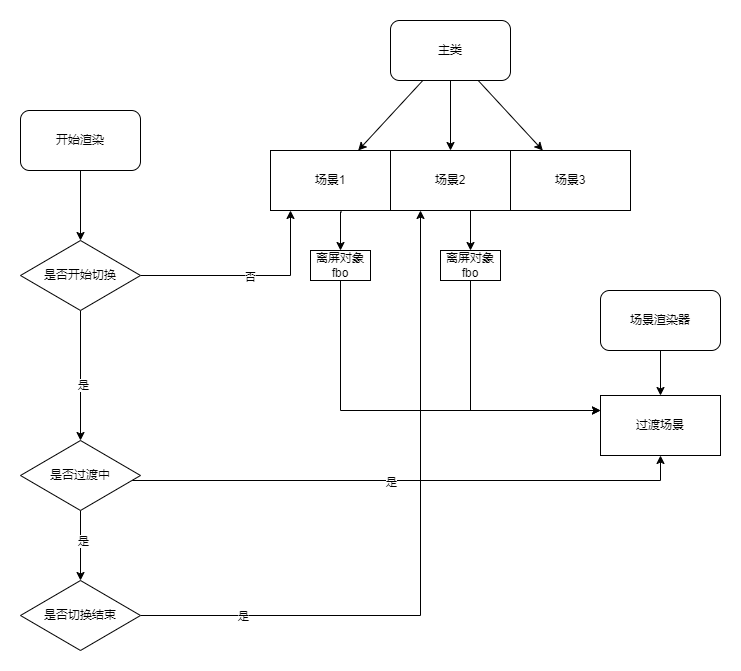
理解了离屏渲染的概念,我们来看下具体的多场景是如何来切换的,我们先对整体的架构有一定了解,其实很好理解;假设现在我们需要从场景1过渡到场景2,开始时渲染场景1,在中间过渡时渲染一个过渡的场景,这个过渡场景将场景1和2离屏对象的纹理进行模糊化展示,最后过渡结束渲染场景2。
我们先将基础的渲染器、相机、轨道控制器等创建好,并且定义在全局,方便在其他类中使用:
谢小飞博客专用防爬虫链接,想要看最新的前端博客请点这里
| let renderer, camera, controls;
export default class Index {
constructor() {
renderer = initRenderer({
physicallyCorrectLights: false,
});
camera = initCamera(new Vector3(0, 500, 2), 100, 1, 20000);
controls = new OrbitControls(camera, renderer.domElement);
controls.minDistance = 5;
controls.maxDistance = 20;
}
}
|
既然是多场景,要体现出多的特性,我们要构建两个及以上的场景及对应的离屏对象,因此我们单独构建一个场景类,用来批量生产场景:
1
2
3
4
5
6
7
8
9
10
11
12
13
14
15
16
17
18
19
20
21
22
23
24
25
| class SingleScene {
constructor(options) {
const { url } = options;
this.scene = initScene();
const renderTargetParameters = {
minFilter: LinearFilter,
magFilter: LinearFilter,
stencilBuffer: false,
};
const sphereGeometry = new SphereGeometry(500, 50, 50);
sphereGeometry.scale(-1, 1, 1);
const sphereMaterial = new MeshBasicMaterial({
map: new TextureLoader().load(url),
});
const sphere = new Mesh(sphereGeometry, sphereMaterial);
this.scene.add(sphere);
this.fbo = new WebGLRenderTarget(offsetWidth, offsetHeight, renderTargetParameters);
}
render(rtt = false) {}
}
|
这里我们构建了一个场景类SingleScene,用来构建单个场景,我们的场景比较简单,只有一个大小为500单位的球体,球体贴图为传入的url;同时实例化一个WebGLRenderTarget离屏对象,用来存储渲染结果。
在渲染SingleScene场景时,由于我们需要根据不同时间点切换将this.scene渲染到离屏对象还是直接到Canvas画布,因此我们需要传入一个参数rtt,如果rtt为true,则将this.scene渲染到离屏对象,否则将离屏对象渲染到renderer。
| class SingleScene {
render(rtt = false) {
if (rtt) {
renderer.setRenderTarget(this.fbo);
renderer.clear();
renderer.render(this.scene, camera);
} else {
renderer.setRenderTarget(null);
renderer.render(this.scene, camera);
}
}
}
|
SingleScene场景类基本就完成了,我们可以在主类中创建多个场景:
| export default class Index {
constructor() {
this.scene1 = new SingleScene({ url: "XXX-1.jpg" });
this.scene2 = new SingleScene({ url: "XXX-2.jpg" });
}
}
|
谢小飞博客专用防爬虫链接,想要看最新的前端博客请点这里
场景渲染器
下面就是最核心的场景渲染器的功能,用于在两个场景中进行切换,我们将所有场景以及过渡场景的渲染都放到这个渲染器中执行;首先初始化时有一个起始的场景,我们将需要的参数定义好:
1
2
3
4
5
6
7
8
9
10
11
12
13
14
15
16
17
18
19
20
21
22
23
24
25
| function TransitionScene(sceneStart) {
const transitionParams = {
transition: 0,
texture: undefined,
useTexture: false,
transitionSpeed: 0.05,
animate: false,
};
this.sceneFrom = sceneStart;
this.sceneTo = undefined;
this.update = (sceneTo, params) => {}
this.render = () => {}
}
|
这个TransitionScene的作用就是初始化的时候保存了一个开始的场景sceneFrom,当切换场景时调用update函数过渡到下一个场景sceneTo;在TransitionScene中,我们再创建一个过渡场景,这个过渡场景使用了正交相机OrthographicCamera以及铺满整个相机视角的平面PlaneGeometry:
1
2
3
4
5
6
7
8
9
10
11
12
13
14
15
16
17
18
19
20
21
22
23
24
25
26
27
28
29
30
31
32
33
34
35
36
37
38
39
40
41
42
43
44
45
46
47
48
49
50
51
52
53
54
55
56
57
58
59
60
61
| function TransitionScene(sceneStart) {
this.scene = new Scene();
this.scene.background = new Color(0x000000);
this.camera = new OrthographicCamera(offsetWidth / -2, offsetWidth / 2, offsetHeight / 2, offsetHeight / -2, -10, 10);
this.material = new ShaderMaterial({
uniforms: {
tDiffuse1: {
value: null,
},
tDiffuse2: {
value: null,
},
mixRatio: {
value: 0.0,
},
threshold: {
value: 0.1,
},
useTexture: {
value: false,
},
tMixTexture: {
value: transitionParams.texture,
},
},
vertexShader: `
varying vec2 vUv;
void main() {
vUv = vec2( uv.x, uv.y );
gl_Position = projectionMatrix * modelViewMatrix * vec4( position, 1.0 );
}
`,
fragmentShader: `
uniform float mixRatio;
uniform sampler2D tDiffuse1;
uniform sampler2D tDiffuse2;
uniform sampler2D tMixTexture;
uniform bool useTexture;
uniform float threshold;
varying vec2 vUv;
void main() {
vec4 texel1 = texture2D( tDiffuse1, vUv );
vec4 texel2 = texture2D( tDiffuse2, vUv );
if (useTexture==true) {
vec4 transitionTexel = texture2D( tMixTexture, vUv );
float r = mixRatio * (1.0 + threshold * 2.0) - threshold;
float mixf=clamp((transitionTexel.r - r)*(1.0/threshold), 0.0, 1.0);
gl_FragColor = mix( texel1, texel2, mixf );
} else {
gl_FragColor = mix( texel2, texel1, mixRatio );
}
}
`,
});
const geometry = new PlaneGeometry(offsetWidth, offsetHeight);
this.quad = new Mesh(geometry, this.material);
this.scene.add(this.quad);
}
|
这个的着色器主要使用三个参数tDiffuse1/tDiffuse2和mixRatio,从名字我们也能猜出来,tDiffuse1/tDiffuse2是两个场景,mixRatio是两个场景的混合程度,我们只需要在过渡时改变这个mixRatio的数值就能呈现出一个渐变的效果。
因此我们继续完善update函数,切换时将新的场景保存到sceneTo,同时将mixRatio设为0:
1
2
3
4
5
6
7
8
9
10
11
12
13
14
15
16
17
18
19
20
| function TransitionScene() {
this.update = (sceneTo, params) => {
if (transitionParams.animate) return false;
const { transitionSpeed = 0.05 } = params;
this.sceneTo = sceneTo;
transitionParams.transition = 0;
transitionParams.transitionSpeed = transitionSpeed;
transitionParams.animate = true;
this.material.uniforms.tDiffuse1.value = this.sceneTo.fbo.texture;
this.material.uniforms.tDiffuse2.value = this.sceneFrom.fbo.texture;
this.material.uniforms.threshold.value = 0.1;
this.material.uniforms.mixRatio.value = 0.0;
return true;
};
}
|
这里我们用到了fbo离屏对象的texture纹理,将其赋值到tDiffuse1和tDiffuse2,在着色器中就可以通过mixRatio数值将两个场景进行混合了。
在TransitionScene渲染时,我们根据transitionParams.transition参数判断渲染时段,0渲染开始场景sceneFrom,1渲染结束场景sceneTo,中间则是渲染过渡场景this.scene:
1
2
3
4
5
6
7
8
9
10
11
12
13
14
15
16
17
18
19
20
21
| function TransitionScene() {
this.render = () => {
if (transitionParams.transition === 0) {
isDef(this.sceneFrom) && this.sceneFrom.render();
} else if (transitionParams.transition >= 1) {
isDef(this.sceneTo) && this.sceneTo.render();
transitionParams.animate = false;
} else {
isDef(this.sceneFrom) && this.sceneFrom.render(true);
isDef(this.sceneTo) && this.sceneTo.render(true);
renderer.setRenderTarget(null);
renderer.clear();
renderer.render(this.scene, this.camera);
}
if (transitionParams.animate && transitionParams.transition <= 1) {
transitionParams.transition = transitionParams.transition + transitionParams.transitionSpeed;
this.material.uniforms.mixRatio.value = transitionParams.transition;
}
}
}
|
谢小飞博客专用防爬虫链接,想要看最新的前端博客请点这里
在过渡执行时,我们将transitionSpeed不断加到transition上,也就是控制混合度mixRatio;同时调用sceneFrom.render和sceneTo.render;这两个render可不是直接渲染,而将离屏渲染到两个fbo中;最后再渲染过渡场景this.scene,此时this.scene中的着色器就可以拿到两个fbo的纹理进行混合。
最后,我们在场景切换完成后,需要把切换后的sceneTo场景,赋值给切换前的sceneFrom场景,为下一次的场景切换做准备:
| function TransitionScene() {
this.render = () => {
if (transitionParams.transition >= 1) {
setTimeout(() => {
this.sceneFrom = this.sceneTo;
transitionParams.transition = 0;
}, 10);
}
}
}
|
这样我们的过渡切换函数基本就完成了,我们在主类中进行调用,开始传入第一个场景scene1:
| class Index {
constructor() {
this.transition = new TransitionScene(this.scene1);
this.render();
}
render() {
this.transition.render();
requestAnimationFrame(this.render.bind(this));
}
}
|
我们来看一下切换的效果:
过渡纹理图案
在上面的着色器代码中我们发现有useTexture和tMixTexture两个参数,可以在切换时呈现过渡的纹理图案效果;我们首先在主类中加载六张纹理的png图片(所有图片笔者已经整理好,在文末领取):
1
2
3
4
5
6
7
8
9
10
11
12
13
14
15
16
17
| class Index {
constructor() {
this.textures = [];
const loader = new TextureLoader();
for (let i = 0; i < 6; i++) {
this.textures.push(loader.load(`/images/textures/transition/transition${i + 1}.png`));
}
this.transitionParams = {
useTexture: false,
transition: 0,
transitionSpeed: 0.05,
texture: this.textures[0],
animate: false,
};
}
}
|
在主类中点击切换场景时,随机选择textures中的一个纹理图片,通过transitionParams参数传入update函数:
| class Index {
changeScene(index) {
this.transitionParams.texture = this.textures[parseInt(Math.random() * 6)];
this.transition.update(toScene, this.transitionParams);
}
}
|
谢小飞博客专用防爬虫链接,想要看最新的前端博客请点这里
我们改造update函数,解构接收参数params中的纹理,传入着色器的uniforms.tMixTexture:
| function TransitionScene() {
this.update = (sceneTo, params) => {
const { texture, useTexture = false, } = params;
transitionParams.texture = texture;
transitionParams.useTexture = useTexture;
this.material.uniforms.tDiffuse1.value = this.sceneTo.fbo.texture;
this.material.uniforms.tDiffuse2.value = this.sceneFrom.fbo.texture;
this.material.uniforms.tMixTexture.value = texture;
this.material.uniforms.useTexture.value = useTexture;
}
}
|
这样,在动画执行时,我们就可以看到不止渐变的效果,还有纹理图案的渐变。
场景列表选择
我们在上一篇文章深入理解自定义指令ClickOutside中说到,点击时需要额外过滤其他的节点的情况;我们先来简单看下页面结构:
1
2
3
4
5
6
7
8
9
10
11
12
13
14
15
16
17
18
19
20
21
22
| <template>
<div>
<div :class="['select-scene']" @click="clickToggleSelectScene">
<div>选择场景</div>
</div>
<div :class="['scene-list_box', isShowSceneList ? 'show' : '']">
<div class="scene-item" v-for="(item, index) in sceneList">
<img :src="item.image" alt="" />
<div class="scene-item_desc">{{ item.name }}</div>
</div>
</div>
</div>
</template>
<script setup>
const isShowSceneList = ref(false);
// 点击展示或隐藏场景列表
const clickToggleSelectScene = () => {
isShowSceneList.value = !isShowSceneList.value;
};
</script>
|
页面很简单,主要就是一个选择场景按钮.select-scene和隐藏的场景列表的div.scene-list_box,当点击选择场景时,设置isShowSceneList为true,就可以显示.scene-list_box。
但是我们设想一下,当点击.scene-list_box外面时,也能够隐藏.scene-list_box,因此就需要用到ClickOutside;我们给.scene-list_box绑定点击外层的触发事件:
| <template>
<div :class="['scene-list_box', isShowSceneList ? 'show' : '']" v-click-outside="hideSelectScene">
</div>
</template>
<script setup>
// 隐藏场景列表
const hideSelectScene = () => {
isShowSceneList.value = false;
};
</script>
|
这样就很尴尬,我们点击选择场景按钮.select-scene时,既触发了clickToggleSelectScene函数,同时又触发了hideSelectScene函数,导致我们的.scene-list_box并不能很好的关闭。
我们就需要将选择场景按钮添加到过滤的excludes数组,然后传入ClickOutside:
| <template>
<div :class="['scene-list_box', isShowSceneList ? 'show' : '']"
v-click-outside:[excludes]="hideSelectScene">
</div>
</template>
<script setup>
const excludes = ref([]);
onMounted(() => {
excludes.value.push(document.querySelector(".select-scene"));
});
</script>
|
谢小飞博客专用防爬虫链接,想要看最新的前端博客请点这里
总结
本文我们通过对离屏渲染概念的了解,深入理解了WebGLRenderTarget类的用法,最后实现了场景切换的过渡效果;在编写页面代码的过程中,还结合上一篇文章学习的ClickOutside指令的用法,完成了选择场景的功能。
本文的全景过渡效果可以点击链接查看
本文所有源码敬请关注公众号【前端壹读】,后台回复关键词【Threejs场景过渡】即可获取。